The Sample Approval Illusion: Why Your Approved Custom Tumbler Sample Is Not a Production Specification
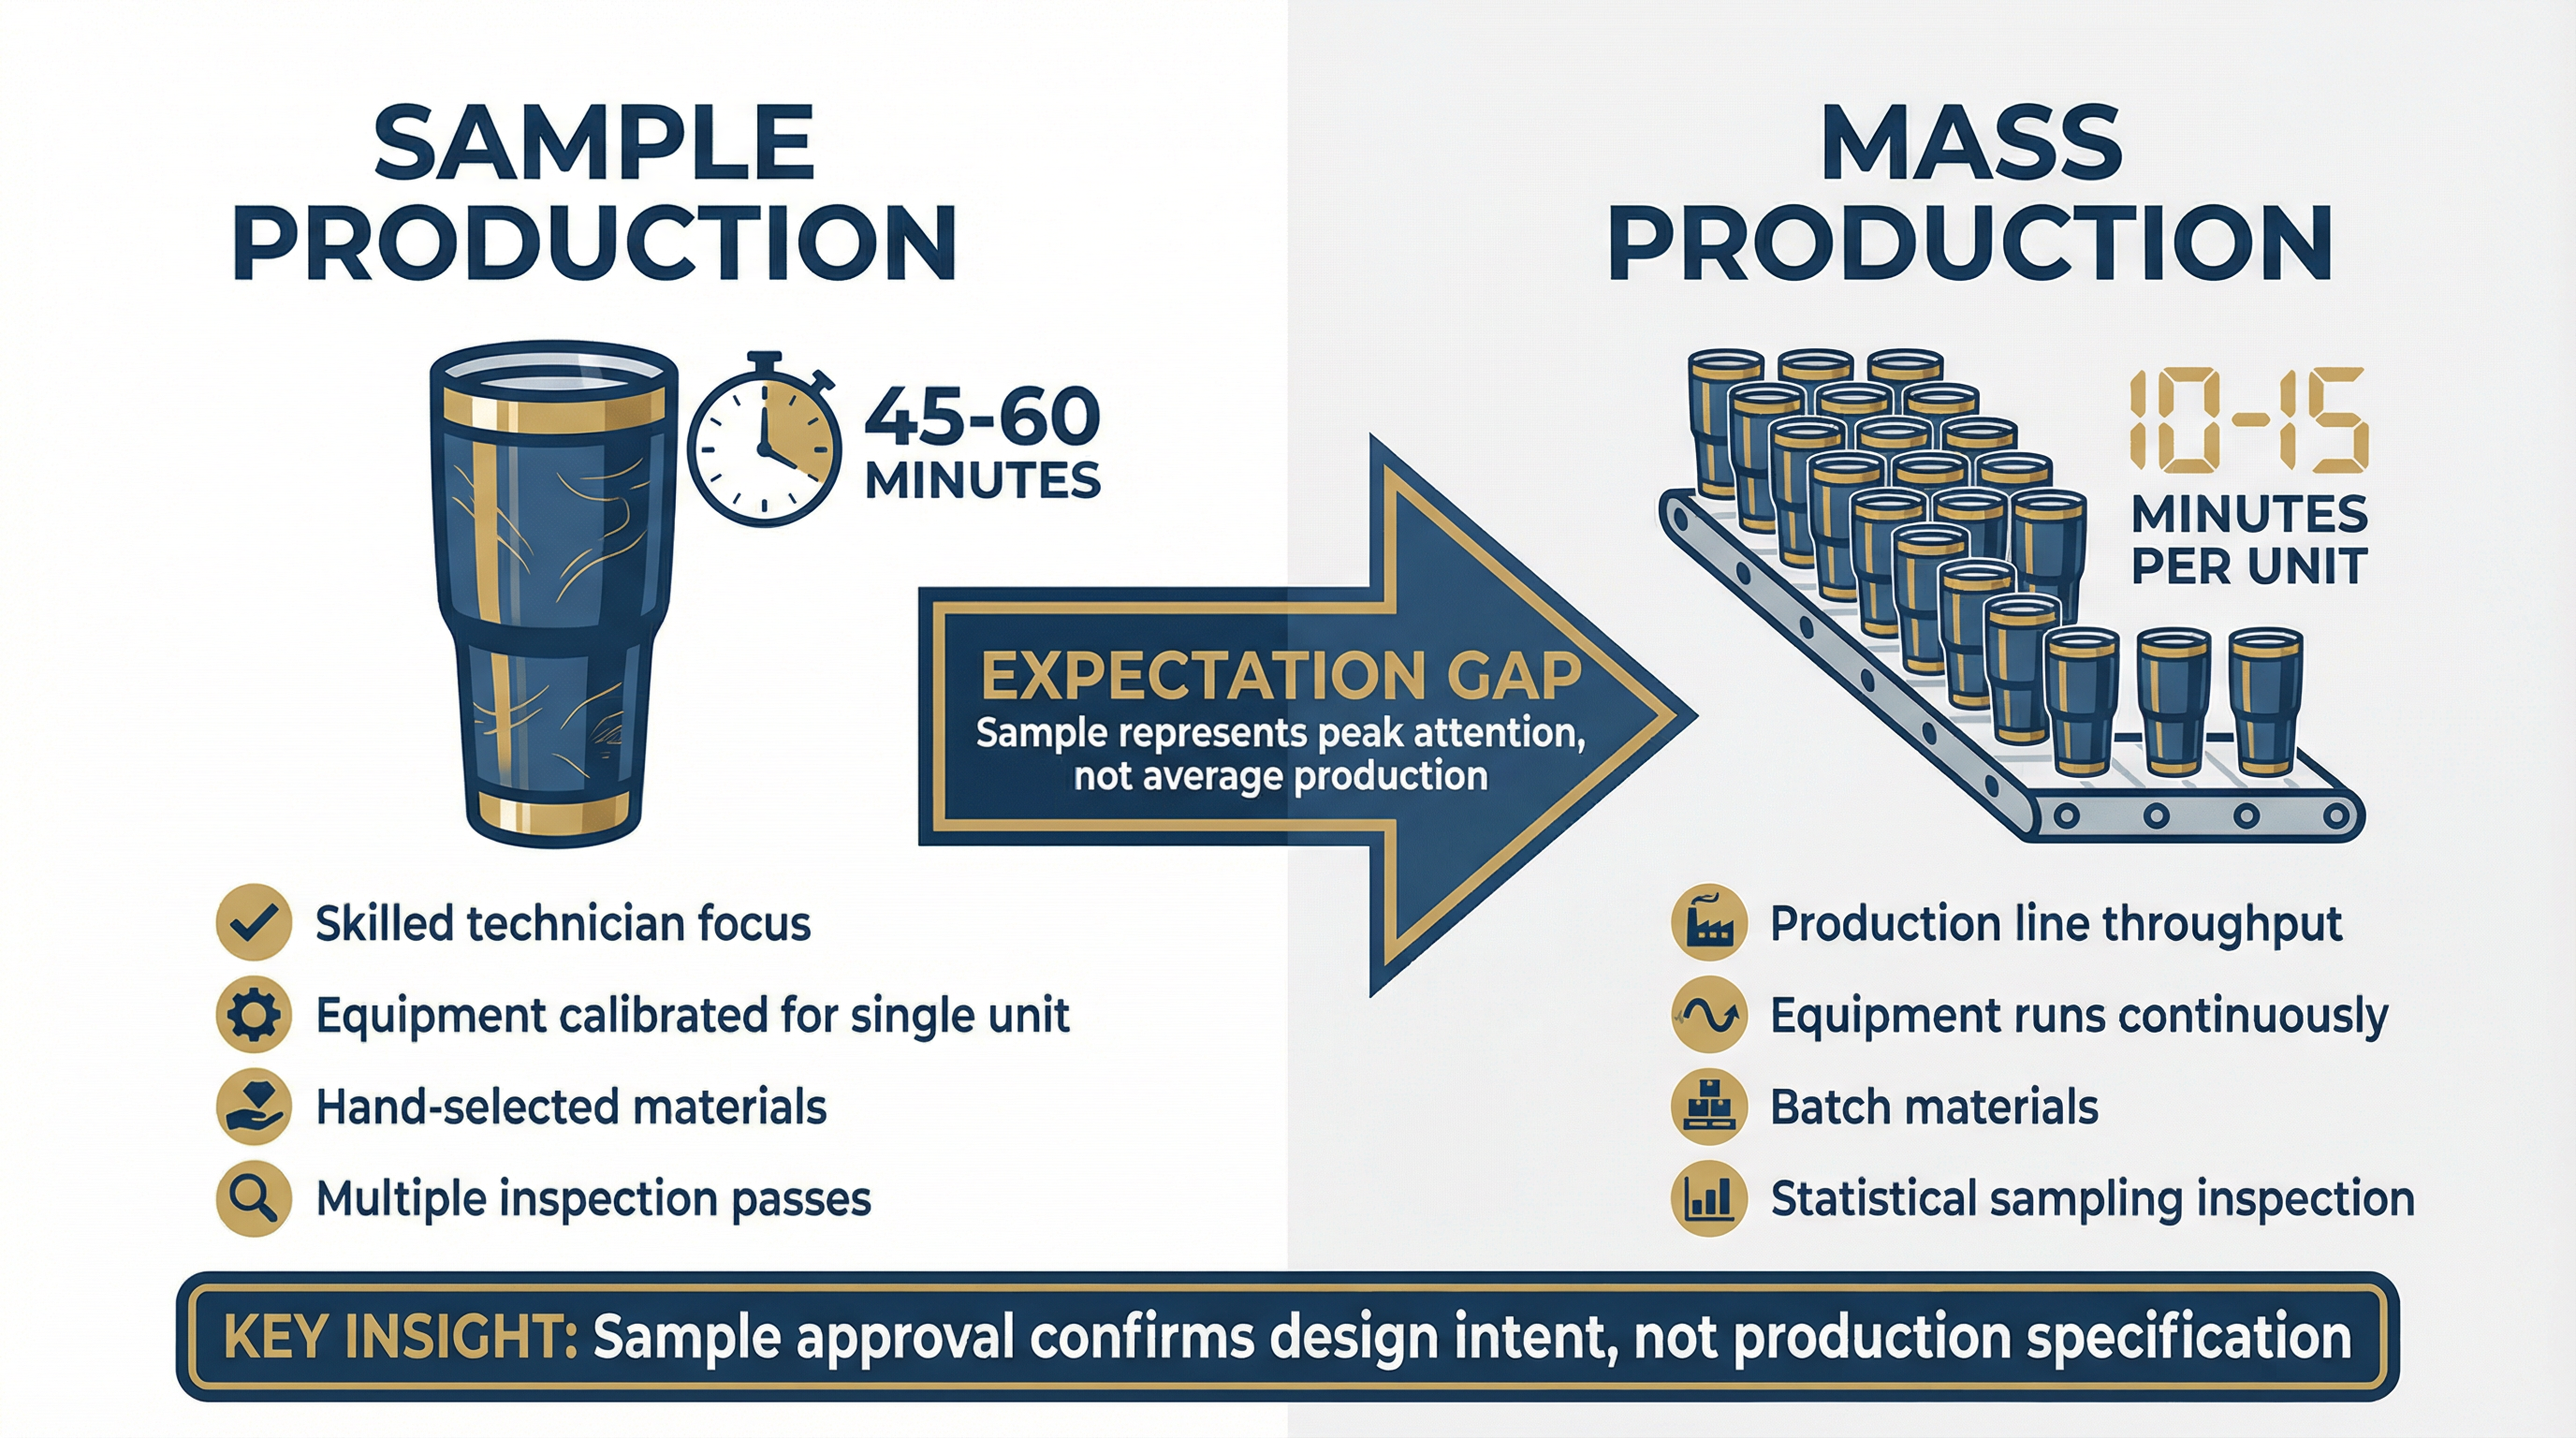
When a procurement manager receives a physical sample of a custom stainless steel tumbler—logo perfectly positioned, Pantone color matching the brand guidelines, powder coating smooth and uniform—the natural assumption is that the 2,000-unit production order will replicate this exact quality level across every piece. This assumption, while intuitive, fundamentally misunderstands what sample approval actually represents in manufacturing terms. The sample sitting on your desk received 45-60 minutes of focused attention from a skilled technician who inspected every weld, calibrated the printing equipment specifically for that single unit, and hand-selected the best materials from available inventory. Your production order will receive 10-15 minutes of attention per unit, processed through equipment that must balance throughput against precision across thousands of cycles. This is not supplier negligence or cost-cutting—it is the physics of manufacturing at scale, and misunderstanding this distinction is where customization process decisions begin to go wrong.

The financial consequences of this misunderstanding are substantial and predictable. When buyers treat the approved sample as an absolute quality specification rather than a design reference with acceptable tolerance ranges, they create conditions for disputes that cost $3,000-8,000 in rework expenses, 2-3 weeks in delivery delays, and significant relationship damage with suppliers who feel accused of "bait and switch" tactics when the actual issue is expectation misalignment. In our experience managing corporate drinkware programs, this sample-to-production gap accounts for approximately 35% of post-delivery quality disputes—more than color matching failures, artwork file issues, or decoration method selection errors combined. The dispute pattern is remarkably consistent: buyer approves sample, production runs, buyer receives shipment, buyer identifies units that don't match sample perfection, buyer demands replacement or refund, supplier points to AQL (Acceptable Quality Level) standards that permit 2.5-4% defect rates, relationship deteriorates.
The root cause is not quality control failure but expectation calibration failure. Manufacturing operates on statistical quality control principles, not perfection mandates. When a supplier quotes a 2.5% AQL for cosmetic defects, they are communicating that 2-3 units per 100 may exhibit minor variations from the approved sample—logo position shifted by 2-3mm, color saturation 5-8% lighter than sample, powder coating texture slightly rougher in localized areas. These variations fall within industry-accepted tolerance ranges and do not constitute defects under standard manufacturing contracts. However, buyers who expect sample-perfect replication interpret these variations as quality failures, creating disputes that consume procurement team bandwidth, delay distribution schedules, and erode supplier relationships that took months to establish.
The sample approval process in custom drinkware manufacturing serves a specific and limited purpose: confirming design intent, not establishing production tolerance specifications. When you approve a sample, you are confirming that the logo placement is correct (centered on the tumbler body, 2.5 inches from the base), the color family is acceptable (Pantone 286C blue rather than 289C navy), the decoration method produces the intended visual effect (laser engraving creates sufficient contrast against brushed stainless steel), and the product construction meets functional requirements (lid seals properly, vacuum insulation maintains temperature). You are not establishing that every production unit must replicate the sample's exact color saturation, surface finish uniformity, or logo positioning to the millimeter. The sample represents the design target; the production specification includes tolerance ranges around that target.
This distinction matters because manufacturing equipment and human operators cannot maintain sample-level precision across extended production runs. A UV printing machine that produces perfect color registration on unit #1 will experience micro-drift by unit #500 as ink viscosity changes with temperature, print heads accumulate microscopic debris, and substrate positioning varies within mechanical tolerances. A powder coating line that applies 80-micron thickness on the sample may vary between 70-90 microns across a 2,000-unit run as spray gun nozzles wear, electrostatic charge fluctuates, and ambient humidity affects powder adhesion. These variations are not defects—they are normal manufacturing physics that every quality engineer understands and every production specification accounts for through tolerance ranges.
The practical question for procurement managers is not whether production variation exists—it does, universally—but whether the variation falls within acceptable limits for the intended use case. A corporate gifting program distributing tumblers to 2,000 employees can tolerate 2-3% of units with minor cosmetic variations (logo position shifted 2mm, color 5% lighter) because recipients will not compare their tumbler against a reference sample. A trade show activation where 500 tumblers are displayed together on a branded table requires tighter consistency because visual comparison is immediate and obvious. A retail product line sold through e-commerce channels requires the tightest tolerances because customer returns for "not as pictured" complaints create direct financial losses. Understanding your tolerance requirements before production—and communicating those requirements to suppliers through explicit specification documents rather than implicit sample approval—prevents the disputes that arise when buyer expectations exceed manufacturing capabilities.
The two-sample checkpoint system represents industry best practice for managing sample-to-production expectations, yet many corporate buyers skip the second checkpoint to accelerate timelines. The first checkpoint—pre-production sample approval—confirms design intent as described above. The second checkpoint—bulk sample approval—confirms that production line setup produces acceptable quality at scale. The bulk sample is pulled from the first 50-100 units of actual production, not manufactured separately with sample-level attention. Reviewing the bulk sample reveals whether production equipment is calibrated correctly, whether operator training is sufficient, and whether material batches meet specifications. Approving the bulk sample before authorizing full production run completion provides a contractual reference point that reflects actual production capability rather than idealized sample conditions.
Skipping the bulk sample checkpoint—which adds 3-5 days to overall lead time—creates the exact conditions for post-delivery disputes. Without bulk sample validation, buyers approve a hand-crafted sample, production runs to completion, and the first quality assessment occurs when 2,000 units arrive at the distribution warehouse. At this point, discovering that production quality doesn't match sample expectations leaves limited options: accept the shipment with documented reservations, negotiate partial refunds or replacement allowances, or reject the shipment entirely and restart with a different supplier. None of these options are desirable, and all could have been prevented by investing 3-5 days in bulk sample review before production completion.
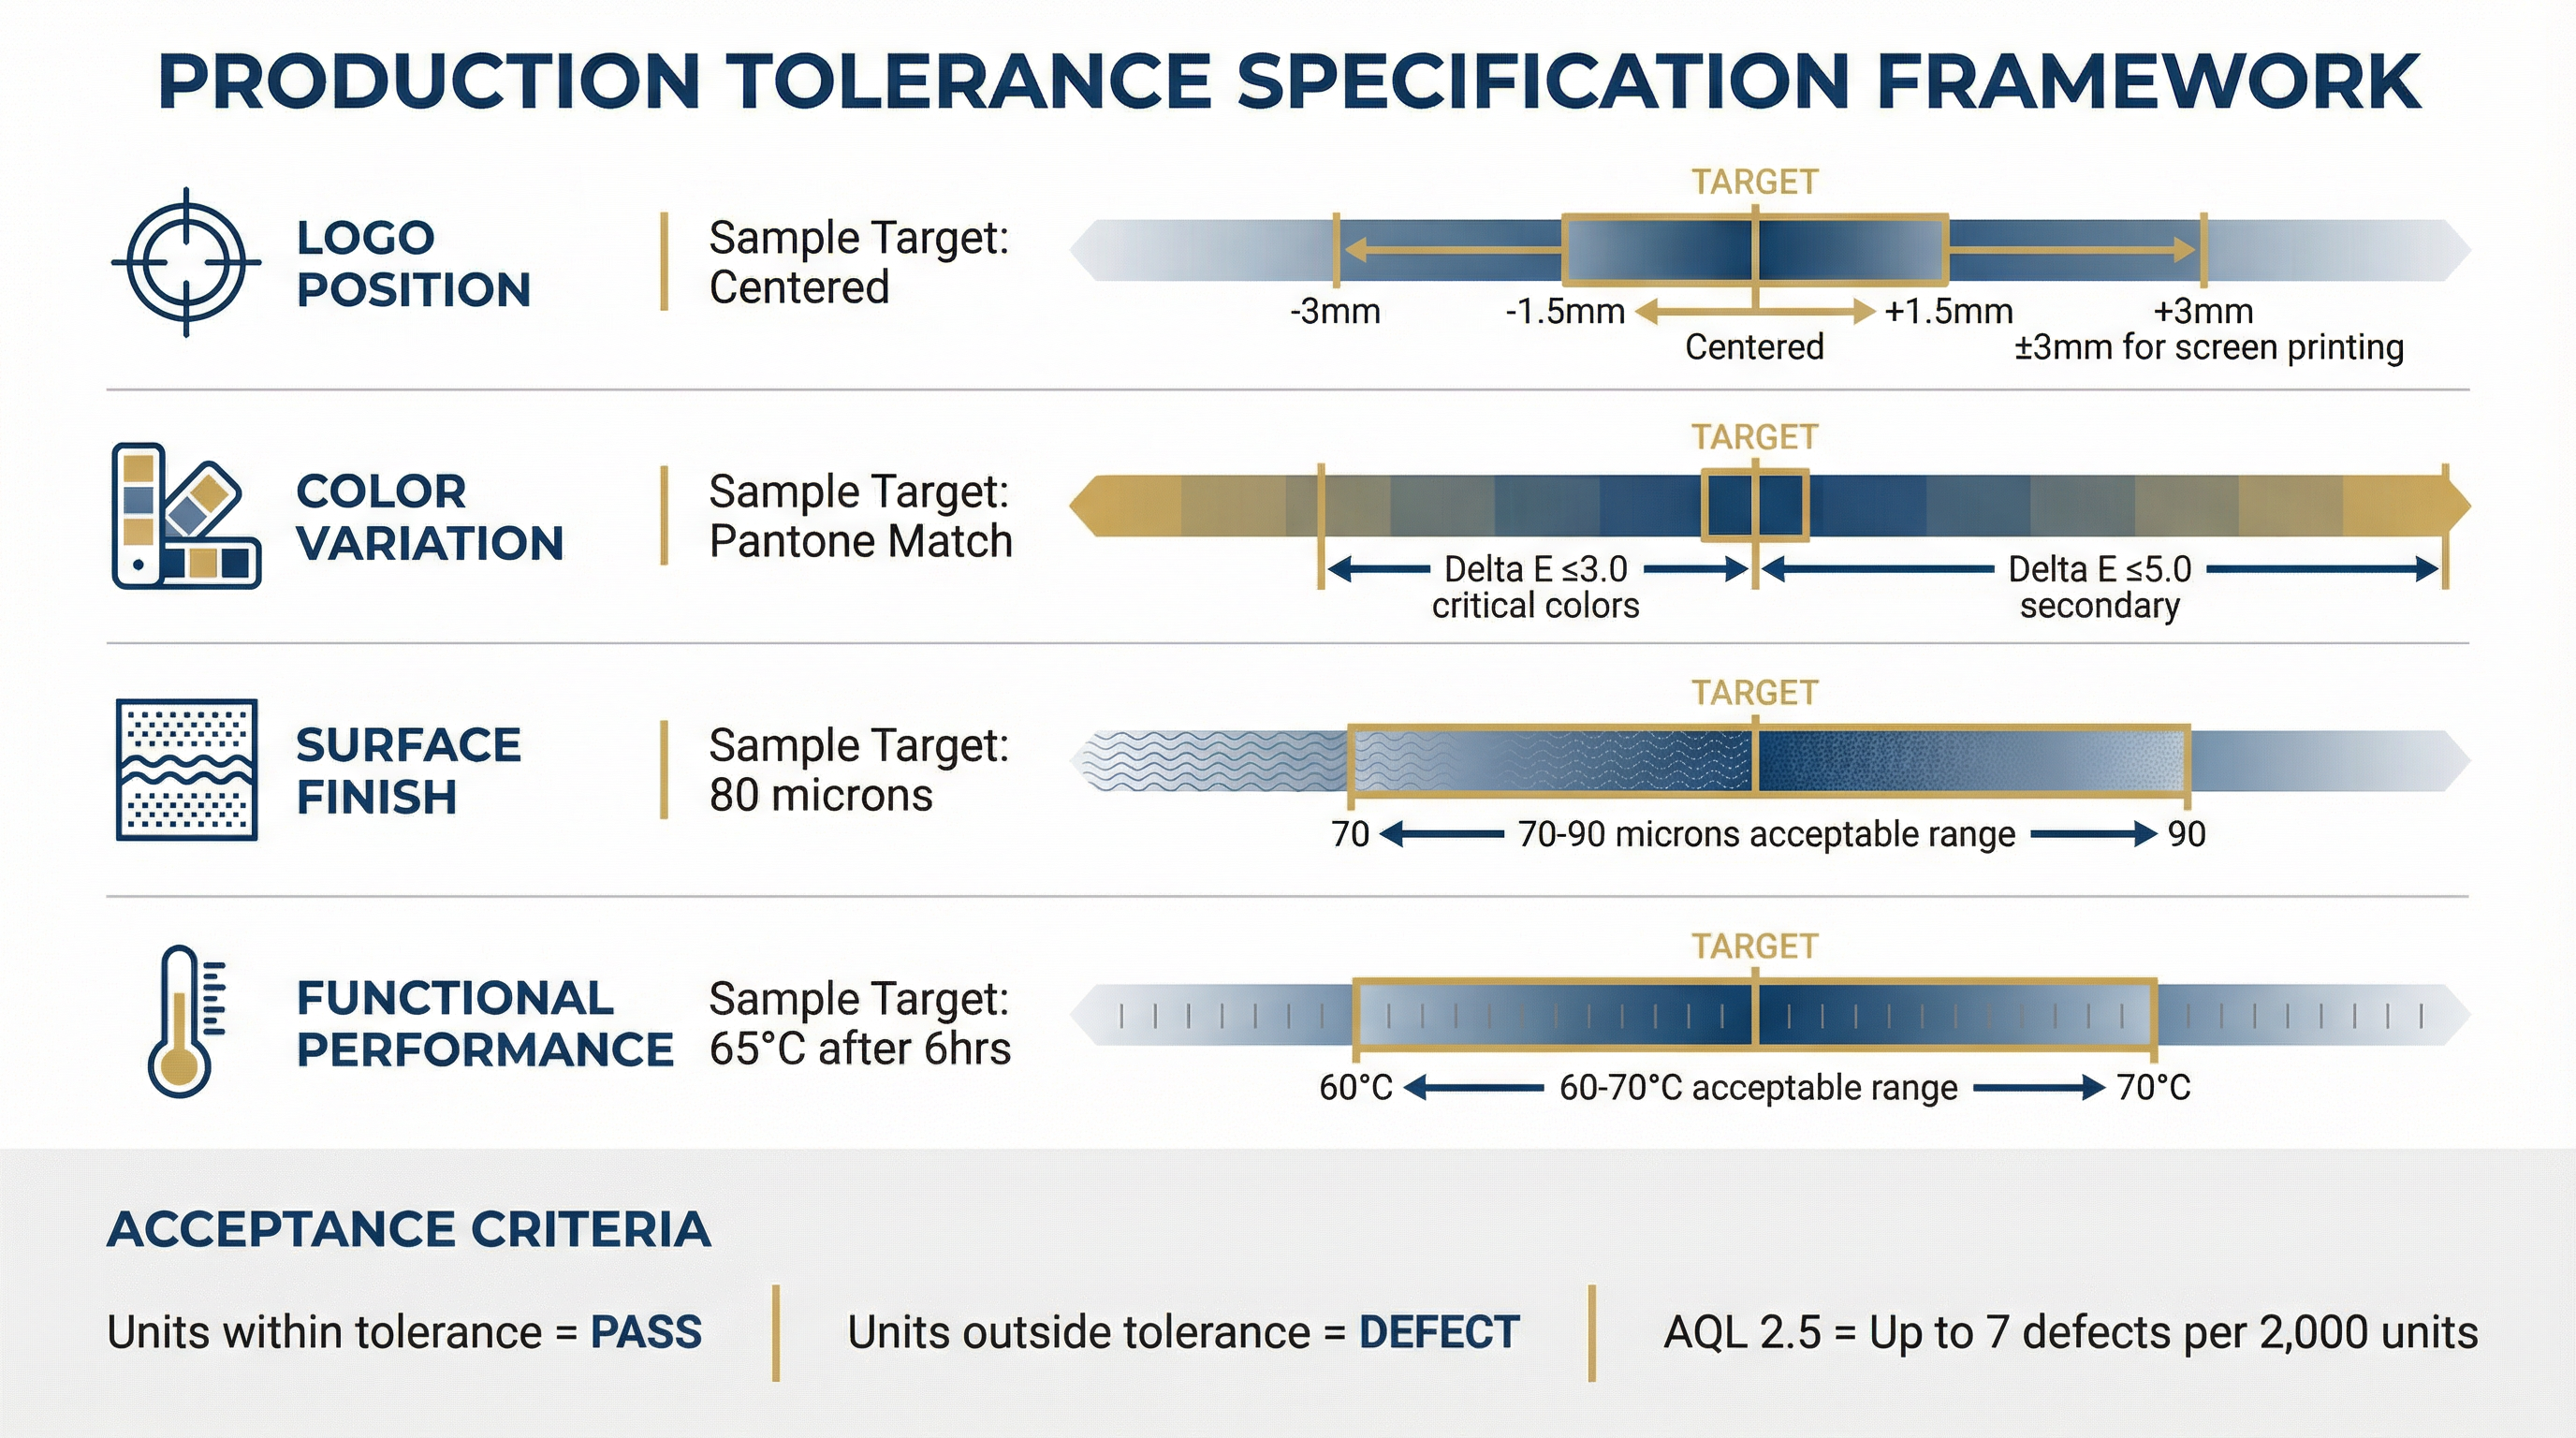
The specification document that accompanies sample approval should explicitly define tolerance ranges for every quality-critical attribute. Logo position tolerance (±3mm from centerline is standard for screen printing, ±1.5mm for UV printing), color variation tolerance (Delta E ≤3.0 for critical brand colors, Delta E ≤5.0 for secondary colors), surface finish consistency (powder coating thickness 70-90 microns, gloss level 25-35 GU), and functional performance standards (vacuum insulation maintains 60°C after 6 hours, lid seal passes 30-second inversion test without leakage). These specifications transform vague "match the sample" expectations into measurable acceptance criteria that both buyer and supplier can objectively evaluate. When disputes arise, the specification document provides contractual clarity—if production units fall within specified tolerances, they meet quality requirements regardless of whether they perfectly replicate the approved sample.

The AQL (Acceptable Quality Level) framework provides the statistical foundation for production quality assessment, yet many procurement managers misunderstand or ignore AQL standards when evaluating received shipments. AQL 2.5 for cosmetic defects—the industry standard for promotional drinkware—means that a 2,000-unit shipment inspected using standard sampling procedures (125 units inspected from the lot) can contain up to 7 defective units and still pass quality acceptance. This is not a loophole that allows suppliers to ship substandard product—it is a statistical acknowledgment that zero-defect manufacturing is economically impractical for products at promotional drinkware price points. Demanding zero-defect production would increase unit costs by 40-60% to cover the additional inspection labor, slower production speeds, and higher rejection rates required to achieve near-perfect quality.
The relationship between sample approval and production specification becomes particularly complex when buyers request design modifications after sample approval. A seemingly minor change—shifting logo position 0.5 inches higher, adjusting Pantone color from 286C to 300C, switching from matte to gloss powder coating—invalidates the approved sample as a quality reference. The production team must recalibrate equipment, potentially produce new samples, and establish new tolerance baselines. Buyers who treat these modifications as trivial adjustments that don't require new sample approval often discover that the "minor change" produced unexpected results: the higher logo position now conflicts with the tumbler's taper, creating distortion; the different Pantone code interacts differently with the powder coating chemistry, producing unexpected color shift; the gloss finish reveals surface imperfections that the matte finish concealed. Each modification reintroduces variation risk that sample approval was designed to mitigate.
For procurement managers working within the broader customization workflow for corporate drinkware, the sample-to-production gap represents a specific risk that requires proactive management rather than reactive dispute resolution. Proactive management means requesting bulk samples before production completion, defining tolerance specifications in writing before sample approval, understanding AQL standards and their implications for acceptable defect rates, and building 3-5 day buffer into project timelines for bulk sample review. Reactive management means discovering quality variations after 2,000 units arrive, negotiating replacement allowances under time pressure, and accepting suboptimal outcomes because distribution deadlines cannot accommodate re-production.
The supplier relationship dynamics around sample-to-production quality deserve explicit attention. Suppliers who have manufactured custom drinkware for years understand that sample-level quality cannot be replicated across production runs—this is foundational knowledge in their industry. When buyers express surprise or disappointment that production quality doesn't match sample perfection, suppliers often interpret this as either inexperience (the buyer doesn't understand manufacturing) or bad faith (the buyer is seeking leverage for price concessions). Neither interpretation supports productive problem-solving. Experienced procurement managers communicate tolerance expectations upfront, request bulk samples as standard practice, and evaluate production quality against specification documents rather than subjective sample comparison. This approach positions the buyer as a knowledgeable partner rather than a difficult customer, creating supplier incentive to prioritize the account and resolve issues collaboratively.
The sample approval illusion persists because it aligns with intuitive expectations about quality control. If a supplier can produce one perfect sample, surely they can produce 2,000 perfect units—the logic seems sound but ignores manufacturing economics and physics. Producing 2,000 sample-quality units would require sample-level attention (45-60 minutes per unit), sample-level inspection (100% visual inspection by skilled technicians), and sample-level material selection (hand-picking the best components from inventory). At standard labor rates, this would add $15-25 per unit to production costs—transforming a $12 tumbler into a $27-37 tumbler. No corporate buyer would accept this pricing, which is why production operates on statistical quality control principles that balance acceptable variation against economic viability.
Understanding this trade-off doesn't mean accepting poor quality—it means calibrating expectations to match manufacturing reality and specifying tolerance requirements that reflect actual use case needs. A tumbler with logo position shifted 2mm from sample specification is not defective if the specification allows ±3mm tolerance. A tumbler with color saturation 6% lighter than sample is not defective if the specification allows Delta E ≤5.0. These variations become defects only when they exceed specified tolerances or when specifications were never established, leaving "match the sample" as the only (and inadequate) quality reference.
The procurement managers who navigate sample-to-production quality most effectively share a common approach: they treat sample approval as the beginning of quality specification, not the end. The approved sample establishes design intent; the tolerance specification document establishes acceptance criteria; the bulk sample validates production capability; the final inspection confirms specification compliance. Each checkpoint serves a distinct purpose, and skipping any checkpoint introduces risk that manifests as post-delivery disputes, rework costs, and relationship damage. The 3-5 days invested in bulk sample review and the 2-3 hours invested in tolerance specification documentation consistently prevent the 2-3 weeks of dispute resolution and $3,000-8,000 rework costs that result from treating sample approval as production specification.